Friday, August 7, 2015

OnShape: Shapes up great!

Eureka! I have found treasure, and its name is Onshape!
Edit: I now use Fusion 360 for my home projects.

My CAD wish list:
  1. Free (or very low cost)*. I need a copy for five family members, and their friends.
  2. Open source*. My previous favorite app was sold and absorbed into a more expensive product. 
  3. Importable/Exportable. Can't bear to leave a design locked in a proprietary format.
  4. True CAD. Associative, sketches, precision, all the good stuff. Written by someone who "gets it".
  5. Collaborative. Need to share those designs and keep up with the latest version.
I ran across Onshape in a trade article somewhere. Didn't want to get my hopes up too much, so I've put it to the test. Tonight I have completed my first test, and this looks like the real deal! It only lacks being open-source, but given the philosophy and business model of this vibrant new company, it seems like a pretty safe bet*.

My test subject:
Harmonic Transformer


The models have been exported from Alibre, and successfully imported into Onshape. I had to rebuild the dome because of errors during export. Happily, I was able to piece-part out the original model as a collection of extrudes, and then perform Boolean operations to reassemble and re-cut the dome. I did have to redraw a couple of parts, which was fairly easy. 


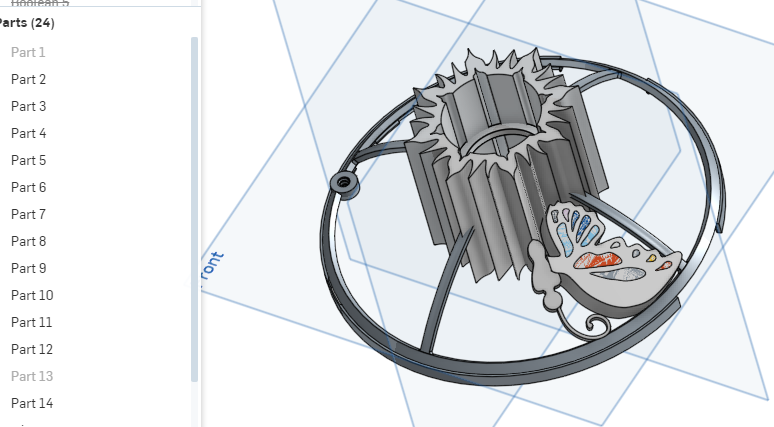
The final dome is possibly better than the original! And the best part? Even though it is no longer a sketch-based model, in Onshape, it is live geometry! I can snap to it, project curves, move faces, and add details. Now my lovely harmonic transformer is free!

Guess what else? I've made it public in Onshape, and you can go make your own copy and play with it too! Grab that little handle, and take it for a spin! Woooooo! :) You'll need to sign in first, and it will take a minute to load in: harmonic transformer


Onshape. My new favorite tool. Go there now. Sign in. Make stuff!

*May have spoken too soon. They just changed the terms for "free" accounts, reducing the amount of storage space. While models can be exported, it is unclear to me whether an Onshape format model can be removed from "the cloud", and then restored to it without loss of functionality. The "pro" plan is costly for a recreational maker, especially for a multi-user family. So when you run out of space, there may be a big problem.

Friday, May 16, 2014

Toasty Fingers

For all those out there with frozen fingers, I offer this solution: the humble heating pad, already available at any drug store or Wal Mart. Keep those fingers toasty!

My office is freezing, no matter what temperature it is outside. The AC blows constantly, and my fingers get cold and stiff. This makes it uncomfortable to type and use the mouse. My employer has banned space heaters, as a cost-saving measure. I have no control over the AC (I even taped up the vents). They won't turn it down/off, because other offices need it. I end up sitting on my hands to warm them. Arguably not the best solution, since that tends to affect my productivity oh, just a tad.

This has finally gone on too long. I tried gloves, jackets, and wrist warmers, to no avail. Between the convection flowing across the backs of my hands and conduction to the cold desk, mouse, and keyboard surfaces, my fingers don't have a chance. Then I thought of a solution. Buy a cheap heating pad, and put it under my mouse and keyboard. Hurrah! Not a perfect fix, but so so so much better. I also turned my computer backwards, so that the fan exhaust blows towards me. That helps a little too.

Solving this problem did not result in a nifty design, and in fact does not seem very interesting at all. However, I've mentioned it to several other people who have commented on how cold their offices are, and they have all been surprised by this simple solution. That made it seem worthy of posting. I have since covered it with a cheap "backpack" from a trade show, and put a mouse pad on it.

Note: This was actually about 1 1/2 years ago, and I still really love it. The keyboard warms up too and keeps my left hand warm as well.

Saturday, March 15, 2014

FreeCAD still in development

I gave FreeCAD a test drive, and built this model in the process.


FreeCAD seems to be in the midst of a major overhaul. In their forums, the developers discuss this excellent presentation from the makers of Solid Edge, and have taken it to heart. Once they digest the very sound advice on making robust CAD models, and roll out the new release, FreeCAD will be worth another look. They are an active and enthusiastic community, and could use more manpower to achieve their goals. However, since my current goal is to create models, I'm going to look elsewhere for now, and give FreeCAD some time to mature.

Update: Go try Onshape!

Thursday, February 20, 2014

Conclusion: I'll give FreeCAD a try

My Model-Creation App Criteria:
  1. Models to be used for manufacture via CNC mill, laser cutter, or extruder 3d printer.
  2. Primarily for mechanism type designs, with artistic/sculptural features to enhance aesthetics.
  3. Models to be shared with online communities, students, and family members.
  4. Low-cost in the short term and long term.
  5. Accessible to students, family. 
CAD fits the bill for design needs. CAD models are solid, avoiding most 3d print errors. They are dimensionally driven (parametric); once you have a feel for how much clearance is needed between a "peg" and a "hole" on your 3d printed parts, that clearance can be used in all future designs. Most CAD apps include at least a modest tool set for aesthetic features.

A separate polygonal app with compatible import/export formats will allow for additional aesthetic flexibility. Also many of the 3d printer models available online are in stl format, which is polygonal and does not import well into CAD.

For fancy formulaic shapes, a scripting app would come in handy.

Open source apps are perfect for low cost and accessibility by all. Also consider that a model format which is not open source, it can be unexpectedly purchased, application prices can go up, or the format might be discontinued. If that happens, you may find yourself locked out of the apps and unable to work in the native format of your designs. 

My selections:
FreeCAD: hopefully this can fill the traditional CAD tool set
Blender: a polygonal app
OpenSCAD: scripted modeler

I'll be sharing my FreeCAD experiences in future posts. The FreeCAD community appears lively and enthusiastic, but the app itself is definitely a work in progress.

UPDATE: FreeCAD still in development
Update: Go try Onshape!

Wednesday, February 19, 2014

The Best App for Creating 3d Models

Have you wondered how to choose between all the many different 3d modeling applications? What makes them different from each other? Here is some info about what is out there, and what their models are used for. 

Rendered models: 
Think Pixar movies. These are large polygonal models for rendered animations, using bones, shaders, nurbs and many many polygons. They will be rendered with fancy lighting and effects that can take a long time to compute. Computational time is not an issue here, though, within reason. 

Some Apps: 3dStudioMax, Lightwave, Maya, Blender


Real-time models: 
Think flight simulators and games. These are also polygonal models. This model type is made to look great but render fast, to be used in interactive simulations. They are streamlined for most efficient rendering; the modeler tends to know each polygon so well that they have individual names and hand-made, lovingly applied textures. The driving criteria for efficiency change with the power of the hardware, but always are a balance between efficient use of polygons and textures, a well laid-out hierarchy, and good levels of detail so the model fidelity will change with viewing distance. The model is a bundle of tricks used to make them look more detailed than they really are.

App: Creator

CAD models: 
Think blueprints for houses or rockets. This is a precision model, and is not made of polygons. A circle is defined by a formula, and is round no matter how far you zoom in on it. The models are solid, or "air tight". Dimensions and constraints control the shapes of the objects. Models are used to make manufacturing drawings and are sent to a shop to make, or the models are used to create CAM routines so automated machinery can produce hardware directly. 

Some Apps: ProEngineer/Creo, Autodesk Inventor, Solid Edge, Rhino, FreeCAD, Alibre
Update: Go try Onshape!


There is, of course, crossover. 3d printers use polygonal model formats to produce parts. The models must be closed in order to print correctly. They can be produced from CAD or from polygonal applications. Apps like Open SCAD produce solid models through scripts, rather than visually. Programmers find this more accessible, and there is capability for making some very exotic formulaic shapes that can't be done with conventional CAD tools.  Sketchup produces models by visually manipulating geometry, making numerical input optional. The models are more CAD-like, although they are not required to be "air tight" solids, and they are not numerically driven like CAD.

Apps: Sketchup, OpenSCAD, 

Sketchup model
3d print of parametric openscad models
Direct Modeling is a new CAD movement appearing from all the major CAD apps, and also the Finite Element Analysis (FEA) crowd is joining in. It appears very much like Sketchup for CAD models, regardless of the native model format. Direct Modeling reads in the files, and frees the user from the hierarchy. It is handy for modifying models that someone else made. Time will tell if it can replace traditional Parametric CAD. For now, Direct Modeling is marketed as an additional app in a suite including Parametric.

Choosing an app depends heavily on your budget and what kind of models you want to make. The price is as low as free, and goes up to the thousands with additional yearly fees for support and upgrades. There are certainly many apps that I did not include, and I'm sure there are quite a few niche apps that I don't really touch on; hopefully this will be helpful as a starting place for your search. I will be posting more articles about the direction I am going. FreeCAD looks promising.


Thursday, November 21, 2013

Tipi pole and hat system

Here is my first follow-up on my tipi post. As I said in that first post, I decided to make a traditional tipi cover, based on instructions in the book "The Indian Tipi", but replace the traditional 17 wooden pole system with a single aluminum center pole to carry the weight of the tipi cover, and 1" nylon webbing serving as guy wires and "poles" for the tipi cover. In the spirit of being pack-able in a car, the pole is made of 2' sections, each having an additional 6" taper for slipping them together. In the photos below, you can see the black webbing "poles" and the sectioned 16' aluminum sch 40 pole.


The above views are looking up through the smoke flaps, which allow venting of smoke from a fire inside the tipi. We did try an open fire inside, but it was unfortunately smokey, and we were worried about CO poisoning. We now have a battery-powered CO detector. That also puts a portable wood-burning stove, preferably rocket-mass-heater style, onto our list of things to explore.


The other thing you may notice is that the smoke flaps allow rain to fall into the tipi. The smoke flaps can be manipulated at angles that will block most of the rain. However, the center, where the pole goes through, is not protected. For that, I made a "hat" with a "crown" of dowels that both keep the hat open in a cone shape, and give the aesthetic hinting at real tipi poles extending above the tipi.


Above is the canvas pattern for the tipi hat. I need to look again at the one I made, and write some instructions on how to sew it. I used a Pfaff sewing machine, because it is capable of sewing through 4-5 layers of canvas. Below is a CAD screenshot of my custom-designed, 3d printed parts for assembling the hat and webbing "poles" to the top of the 16' aluminum pole. The parts are available for download at Thingiverse.


The webbing goes through the green "pole cap", which has a conical shape. I plan to rework this part, because the straps end up cracking the vertical features. There are five straps in all, creating ten "poles". The "cone" sits on the top of the rain hat. The "plug" is underneath, and the two are bolted together, sandwiching the canvas in between. The "cone" holds the dowels, which go into pockets in the canvas.


Below is a view inside the rain hat, showing three bungees feeding through the canvas around the "plug". They stretch down and hook into the holes in the part labeled "pipe", and hold the rain hat in place. In the above photo, you can see the knotted end of the bungee, as it feeds through the cone.


I made an "accessory ring" that locks into the groove where the aluminum poles join. It is useful for hanging things from. The ring clamp is in two sections, and locks in place when the accessory ring slides over the top of them. 


Monday, November 18, 2013

Harmonic Transformer Design Process

Here is a very brief snapshot of the design process for my Ideal Harmonic Transformer. The images are pulled from my various blog posts, where more detail is provided. I hope this gives you insight into the process of developing a design. Time, patience, and iteration are required.